|
1. Create a new
multisession disc
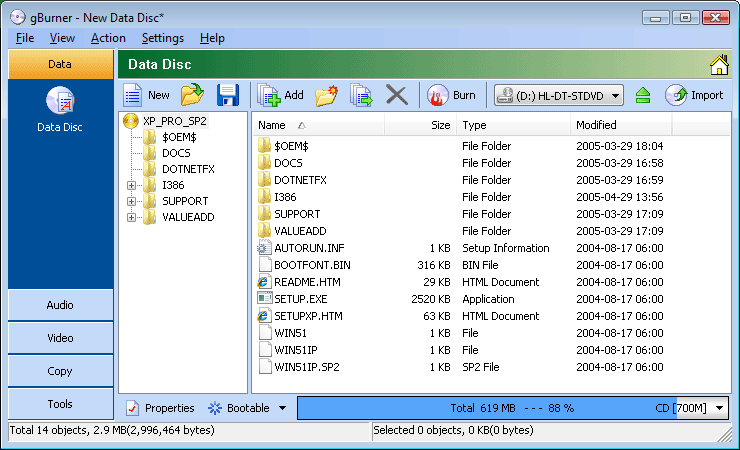

Add files and folders: Click on the  icon
to add files and folders. You can also directly drag files and folders from
Windows Explorer to the project window. icon
to add files and folders. You can also directly drag files and folders from
Windows Explorer to the project window.
Create new folder: Click on the  icon
to create a new folder. icon
to create a new folder.
Delete files and folders: Select the files and folders you want to delete,
then click on the  icon. icon.
Rename file or folder: Click the file or folder you want to rename, click it
again (not double click), then type the new name.
Change label: Click the disc label, click it again (not double click), then
type the new label.


-
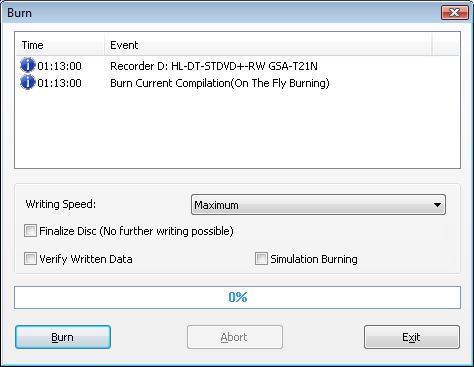
If you want to save the current project, Click on the  icon. icon.
-
Click on the  icon, the burn dialog opens. icon, the burn dialog opens.
-
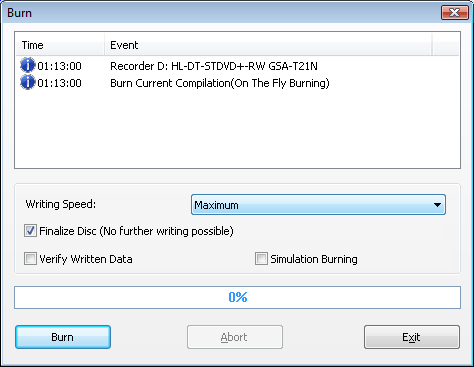
Select or check the required burn options.
You must
remember to uncheck "Finalize Disc" option which allows you
to add more session in future. this checkbox is only
checked for the last session of the CD/DVD/BD.
-
Click on the "Burn" button
to start the actual burn process.
2. Continue
multisession disc

Add files and folders: Click on the icon
to add files and folders. You can also directly drag files and folders from
Windows Explorer to the project window.
Create new folder: Click on the icon
to create a new folder.
Delete files and folders: Select the files and folders you want to delete,
then click on the icon.
Rename file or folder: Click the file or folder you want to rename, click it
again (not double click), then type the new name.
Change label: Click the disc label, click it again (not double click), then
type the new label.
-
If necessary, Click on the  icon
to set disc properties. icon
to set disc properties.
-
Click on the icon,
the burn dialog opens.
-
Select or check the required burn options.
You must
remember to uncheck "Finalize Disc" option which allows you
to add more session in future. this checkbox is only
checked for the last session of the CD/DVD/BD.
-
Click on the "Burn" button
to start the actual burn process.
3. Finish multisession disc
Add files and folders: Click on the icon
to add files and folders. You can also directly drag files and folders from
Windows Explorer to the project window.
Create new folder: Click on the icon
to create a new folder.
Delete files and folders: Select the files and folders you want to delete, then click on
the icon.
Rename file or folder: Click the file or folder you want to rename, click it again
(not double click), then type the new name.
Change label: Click the disc label, click it again (not double click), then type the new label.
-
If necessary, Click on the icon
to set disc properties.
-
Click on the icon,
the burn dialog opens.
-
Select or check the required burn options.
Please check the "Finalize Disc" option which closes the disc so that you cannot
write to this disc anymore.
-
Click on the "Burn" button to start the actual burn process.
|